Developed Trimmed Surface Example
This example shows how you can use an attached curve to trim off a portion of a surface. Afterwards, it shows you how to develop or layout the trimmed surface. Specifically, a half cone is created and a polyline is attached to the surface, closed, and shaped into a star. The inside of the star is trimmed out and the resulting surface is developed.
Step 1. Display or click on the “top view” on the screen.
Step 2. Select the Create 3D-Cylinder/Cone-Dialog Input command to display the following dialog box. This dialog box allows you to create all variations of cones and cylinders, with or without thickness and with or without the ends capped or closed off. We will make a simple half cone with no thickness and no ends closed or capped off. Change the default values to those shown below. Note that the height and width of the “back end” of the cone is set to zero and the stop angle is changed to 180 degrees. Also note that the number of rows has been changed to 19. This is the number of surface definition rows that the program will use to define the half cone. For 180 degrees, this is one row per 10 degrees.
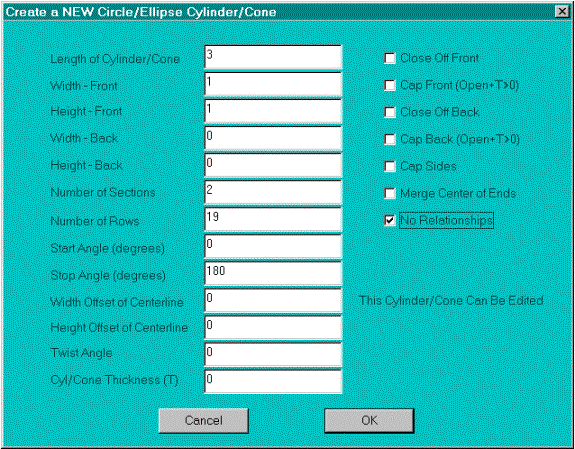
Step 3. When you select the OK button, you the program will create a half cone of length 3, as shown below. [You may have to use the View-Reset View to see the cone.]
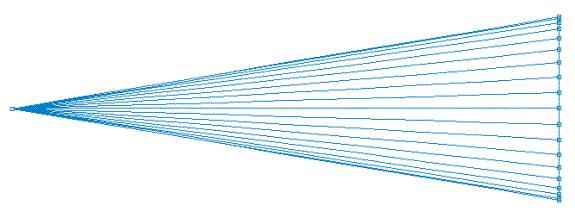
Step 4. Next, select the Curve-Add Polyline to Surface command. This will become the current command. In the top view of the model, pick points on the half cone to define a 5-point star, as shown in the picture below. You do not have to be too accurate, since you will be able to edit the curve after you have attached it to the surface. [We are not too concerned about exact measurements for this example.]
Step 5. Select the Edit Point-Merge Pnt To Pnt command to attach or merge the ends of the polyline together. This will allow you to edit the shape without it separating.
Step 6. Select the Edit-Move Point command and start moving the points of the star to get the shape that you desire. Note that since the polyline is attached to the surface, you cannot move a point off of the surface. Also, note that even though this is a polyline, the shape is curved because the surface is curved. Remember, you can use any of the standard curve manipulation commands with this attached curve. You can insert and delete points and you can change any of the hard “knuckle” points to curves using the Curve-Knuckle Pnt command. You can also turn on the K-curve fairing curve for the attached curve.
Step 7. Manipulate the star on the surface until you get the shape you desire. Make sure that the start is closed.
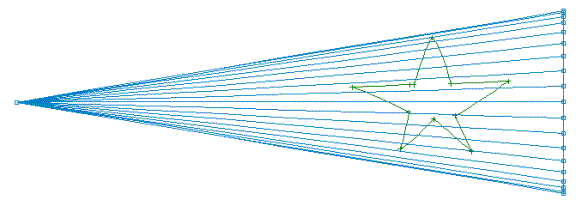
Step 8. Select the Surf-Trim Surface-Trim Surface command. To trim a portion of a surface, you need to first pick the trimming curve and then pick the portion of the surface you with to trim off. Pick the star polyline and then pick any point on the inside of the star. You should see a picture like the one shown below.
The important thing to note is that this technique can create trimmed shapes that cannot be made by projecting curves through a surface. Most programs allow you to trim surfaces by either projecting a curve straight through a surface or by intersecting two surfaces. Some complicated trim shapes that wrap around a curved surface cannot be made by either of these techniques. By attaching a curve (or polyline) to a surface, you can easily create any trimming shape. The added benefit is that you can directly edit this shape or use it to construct other geometry.

Rendered View of the Model
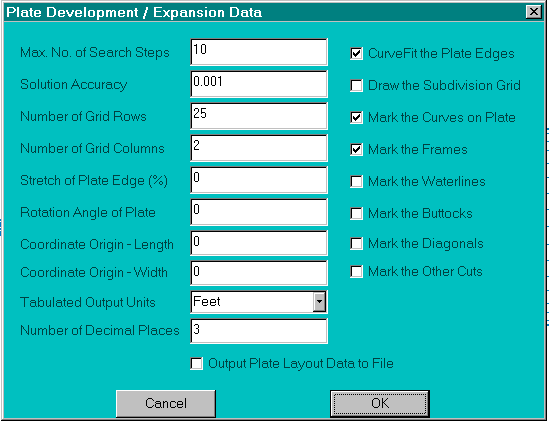
Step 9. Select the Develop-Develop Plate command and then pick the cone surface. This will display the dialog box shown below. This command will unwrap or expand any type of surface. Since a cone is a true developable surface, there is no concern about the stretch or distortion when it is unwrapped flat. Don’t change any values and just pick the OK button. [If you are interested, see the help manual for a complete explanation of these fields.]
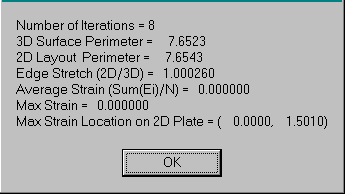
Step 10. When you pick the OK button, the program will unwrap the surface and then display the following results box. It shows you information about how much internal stretching or strain takes place during the flattening process. For the cone, there is no stretching during the unwrapping process.
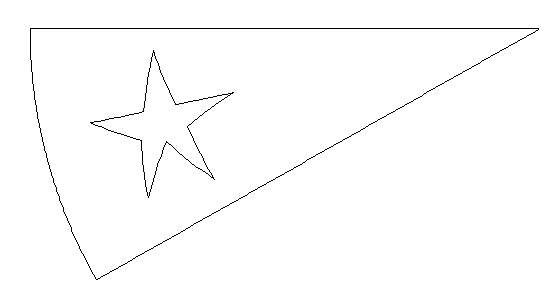
Step 11. After you pick the OK button on the box above, the program will display the shape shown below.
Step 12. To output this shape to a DXF file, select the File-Data File Output-DXF Output command. [Make sure that this developed shape is displayed in the current view on the screen.] The program will display the DXF File Output dialog box, as shown below.
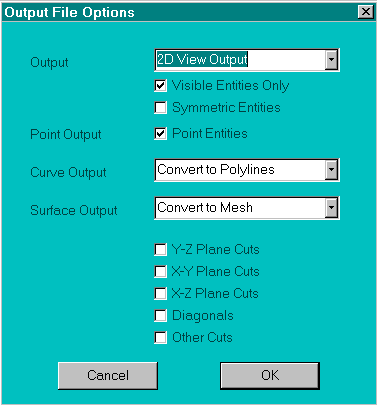
Step 13. The only change you have to make is to change the “Output” field to “2D View Output” to make sure that the program outputs the current developed surface shape. Once you pick the OK button, the program will prompt you with a file output dialog box. You need to select a file folder and name and remember to include the “.dxf” file extension. This DXF file can then be read into many other CAD and CAM programs.